
In this step-by-step guide, you’ll discover how to create macros on your gaming keyboard to elevate your gaming experience and streamline your gameplay. By automating repetitive tasks and executing complex commands with ease, you can focus more on strategy and less on manual input, ultimately gaining a competitive edge in your favorite games. We understand the importance of maximizing your performance, so this guide ensures that you can set up macros quickly and intuitively, allowing you to immerse yourself fully in the action while enjoying the benefits of enhanced efficiency.


1. Choose the Right Gaming Keyboard
Explore gaming keyboards that offer macro functionality, as this feature can significantly enhance your gaming experience. Seek out models that include dedicated macro keys, which allow you to assign complex commands or sequences to a single key press. For example, keyboards like the Logitech G Pro or Razer BlackWidow Elite come equipped with customizable macro keys that can be programmed directly via their respective software, offering a seamless way to execute intricate moves in fast-paced games.
Utilize software that supports macro customization if your keyboard lacks dedicated keys. Software like Corsair’s iCUE or Razer Synapse allows us to create and save macro profiles tailored to our gaming preferences. Simply download the software, select your keyboard model, and follow the prompts to assign specific functions to chosen keys. An example would be creating a macro for a multi-step combo in an MMO, where one key can cast a series of spells in rapid succession, giving us a competitive edge.


2. Install the Keyboard Software
Visit the official website of your keyboard manufacturer to locate the software download section. Search for the specific model of your keyboard and select the appropriate software version for your operating system. Click on the download link and wait for the file to download completely. Once the download is finished, navigate to your downloads folder and double-click the installation file to begin the setup process. Follow the on-screen prompts, which may include accepting license agreements and selecting installation preferences.
After the installation is complete, launch the software from your desktop or start menu. Familiarize yourself with the interface, as this is where you can create and manage macros, adjust key assignments, and customize RGB lighting if your keyboard supports it. Explore the various settings available to tailor your keyboard to suit your preferences, ensuring you get the most out of your new device.
3. Open the Macro Settings
Launch the keyboard software that came with your device or download it from the manufacturer’s website if you haven’t already. Once the software is open, look for a section typically labeled as ‘Macros’ or ‘Key Assignments’ in the main menu or sidebar. This is where we can customize and create macros to enhance our typing experience or gaming performance.
Navigate through the interface until you find the macro settings area. Here, we’ll see options to record new macros, edit existing ones, and assign them to specific keys on our keyboard. Click on the appropriate button to start creating a new macro. Follow the prompts to record our desired keystrokes or commands, and remember to save our settings once we finish.
4. Create a New Macro
Click on the option to create a new macro within your application. This option is typically found in the “Macros” menu or under a “Tools” section. Once you select it, prepare to be prompted to record the series of keystrokes or commands you wish to automate. Make sure you’re in the right context where your desired actions can be executed correctly.
Follow the on-screen instructions diligently. When recording starts, perform the actions you want to automate exactly as you would normally do. Be mindful of every keystroke and command, as these will be captured. If you make a mistake, many applications allow you to stop the recording and start over, so don’t worry! Once your actions are complete, stop the recording according to the provided instructions. This will save your macro for future use.
5. Assign the Macro to a Key
Assign the macro to a key on your keyboard to streamline your workflow and enhance productivity. Follow these steps to make it happen:
- Open your macro editor or software where your macros are stored.
- Locate the macro you just created in the list of available macros.
- Select the macro and drag it to the key on your keyboard where you want it assigned.
- Alternatively, right-click on the macro and choose “Assign” or “Set Key” from the context menu.
- A list of available keys will appear; select your desired key from this list.
- Confirm your selection, and you may need to save your changes before exiting the editor.
Test the assignment by pressing the designated key to ensure the macro runs as expected. Enjoy the efficiency that comes with quick access to your frequently used actions!
6. Test the Macro
Open your chosen game or text editor where you plan to use the macro. Activate the macro by using the designated keyboard shortcut or button you set earlier. Observe the macro closely as it performs its function. Ensure that all actions occur as expected, and take note of any discrepancies between the intended and actual performance.
Adjust the macro settings if it does not work correctly. Access the macro editor within your software, and modify any parameters that may not align with your expectations. Rerun the macro after making adjustments to confirm that it operates smoothly. Repeat this testing process until the macro functions flawlessly.
Mastering Your Gaming Experience
In conclusion, creating macros on your gaming keyboard is a straightforward process that can greatly boost both your efficiency and enjoyment during gameplay. By following the steps we’ve outlined, you can customize your keyboard to suit your gaming style, allowing you to execute complex commands with ease. So, let’s take advantage of this powerful feature to elevate our gaming experience to the next level! Happy gaming!
Essential Gear Needed
- Gaming keyboard with macro capabilities
- Keyboard software (specific to the brand/model)
- USB cable (if applicable)
- Mouse (optional for navigation)
- Headphones or speakers (for audio feedback, optional)
- Additional keys or keycaps (if customizable)
- Manual or user guide for the keyboard (optional)


Master Your Keyboard
- Know Your Keyboard: Familiarize yourself with your specific gaming keyboard model and its software, as different brands may have unique features and interfaces
- Install the Required Software: Download and install the official software for your gaming keyboard to access macro settings and customization options
- Access Macro Settings: Open the software and navigate to the macro or customization section to create and assign macros
- Record Your Macros: Use the recording feature to capture keystrokes and mouse actions, ensuring you perform them in the exact order needed for your gameplay
- Edit Macros for Precision: After recording, edit your macros to fine-tune timings, add delays, or remove unnecessary inputs for optimal performance
- Assign Macros to Keys: Choose a convenient key on your keyboard to assign your newly created macro, ensuring it’s easily accessible during gameplay
- Test Your Macros: Before diving into a game, test your macros in a safe environment to ensure they work as intended and adjust if necessary
- Stay Within Game Rules: Be mindful of the rules regarding macros in the games you play, as some titles may have restrictions on their use
- Organize Your Profiles: If your keyboard supports multiple profiles, organize your macros by game or play style for quick access during gaming sessions
- Keep It Simple: Start with basic macros and gradually experiment with more complex ones as you become comfortable with the process
If anyone’s looking for more tips on input devices, check out customizable mouse buttons too! They can be just as useful for gaming and productivity. Combining both can really amp up your efficiency!
Great suggestion! Customizable mice like the Razer Naga or Logitech G502 can complement your keyboard macros beautifully. More control equals more power!
Absolutely! For advanced macros, try chaining multiple actions together, like combining key presses with timing delays. This can be especially useful for games that require quick combos. Keep experimenting until you find what works best for you!
I actually took the steps in the guide but reversed them a bit. Instead of assigning the macro to a key first, I experimented with creating a few macros first so I could see which ones I liked best before binding them. It worked out really well for me!
That’s a smart approach! Experimenting with macros first allows you to refine your choices before committing them to a key. Thanks for sharing your method!
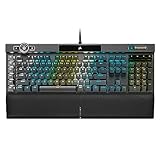
Could you recommend a good gaming keyboard for someone who’s just getting into macros? I’m looking at the Corsair K70 RGB, but is it worth it?
The Corsair K70 RGB is a solid choice! It has great build quality and customizable RGB lighting, plus excellent software for macro creation. You won’t be disappointed!
Hey, any chance you could share some advanced tips on how to create more complex macros? Like combo moves for fighting games or something? Would love to up my game! Thanks!
I’m curious, don’t you think using macros might give some players an unfair advantage? I mean, where’s the line between skill and automation?
That’s a great point! It really depends on the game’s rules and community standards. Some see it as a tool for efficiency, while others view it as cheating. It’s always good to check the game’s policies before diving in!
I just recently set up macros for my Logitech G Pro X keyboard to automate some tasks in Photoshop. Seriously, it has sped up my workflow so much! Thanks for the guide, it really helped me get started!
That’s awesome to hear! Using macros for productivity tools like Photoshop can be a game changer. Glad the guide helped you out!
Have you thought about adding a section on the different types of gaming keyboards? Like mechanical vs. membrane? That would be super helpful for newbies trying to choose one.